
- Knowledge Base
- ArtCloud Manager - Analytics
- Analytics Overview
-
Getting Started with ArtCloud
-
ArtCloud for Artists
-
ArtCloud Manager - Dashboard
-
ArtCloud Manager - Inventory
-
ArtCloud Manager - Artists
-
ArtCloud Manager - Exhibition
-
ArtCloud Manager - Invoices
-
ArtCloud Manager - Logistics & Purchase Orders
-
ArtCloud Manager - Marketing/Sales
-
ArtCloud Manager - Contacts
-
ArtCloud Manager - Analytics
-
Account Settings
-
The ArtCloud Marketplace
-
ArtCloud Website Builder
- Sitebuilder 3.0
- Artist Block Configuration
- Inventory Block Configuration
- Exhibition Block Configuration
- Blocks / Snippets
- Blocks / Snippets - Pro+
- Pages
- Page Templates
- Page Templates - Artist Profile
- Page Templates - Inventory Detail
- Page Templates - Exhibition Detail
- Page Templates - Header
- Page Templates - Footer
- Blog
- Media
- Design
- Settings
- Navigation
- Domains
-
ArtCloud Website Management
-
Privacy and Terms
Set the date range on an Analytics report
Get data from a specific time period.
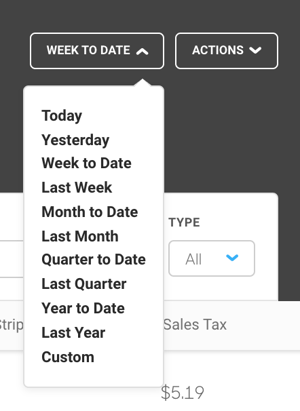
To retrieve data or generate reports from a specific period, you can use the Date Range Dropdown in any of the Analytics panel’s reports pages.
By default, I the top-right of all Analytics screens, there is a Week to Date dropdown to the left of the Actions dropdown. This is the period of time from which the display table in your analytics page is displaying data. This can be changed to the following timespans:
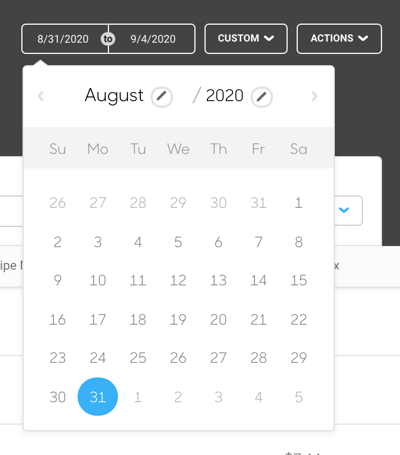
Set the date range to a custom set of dates
Clicking the Custom option in the aforementioned dropdown will cause two new fields to appear in the top-right corner of the screen.

By clicking on either date to the left of the Actions and Custom dropdown, a date-picker will appear, allowing you to set the date that you would like to begin displaying data for, and the date that you would like to stop displaying data for.
In this case, I wanted to retrieve data from April 5th, 2017 to October 17th, 2017, I would set my date-picker like so:

When changing the month or year on the date-picker, be sure to select a date, or your selected date will not be applied. When you want to change the date from, say, May 25th, 2020 to May 25th, 2018, you’ll need to both select the year dropdown and click a date, or no changes will occur.
Sugested Reading:
- Intro to the Analytics Panel
- How to generate analytics reports and set the fields they display